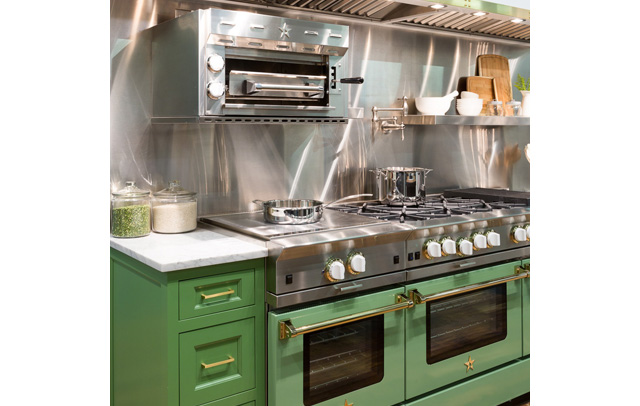
A home kitchen salamander might sound like a curious choice, but this versatile appliance is making waves in modern culinary design. Named after the mythical creature known for its ability to withstand fire, the kitchen salamander is a powerful, compact broiler that brings a new level of precision and versatility to cooking.
Unlike traditional ovens, the salamander is designed to operate with a direct, intense heat source from above, which allows for faster and more even cooking. It’s ideal for tasks like melting cheese, crisping up a crème brûlée, or quickly finishing off a dish with a perfect golden top.
In contemporary kitchens, especially those designed with an eye toward both functionality and aesthetics, the salamander stands out not just for its performance but also for its sleek, professional look. It integrates seamlessly into both high-end home kitchens and split-level designs, where it can be a statement piece as well as a workhorse. For the home chef who values precision and efficiency, the kitchen salamander offers an exciting blend of tradition and innovation, elevating everyday cooking to a gourmet experience.
Sizzle & Serve: The Home Kitchen Salamander Revolution
This comprehensive guide will explore the kitchen salamander in detail, from its functionality and benefits to installation tips and creative uses.For more information visit here
Table of Contents
What is a Kitchen Salamander?
A home kitchen salamander is a specialized broiler designed to deliver high-intensity, overhead heat. Unlike traditional ovens or grills, the salamander’s primary function is to provide a powerful heat source from above, allowing for quick and precise cooking. Its design is typically compact, with an adjustable rack that can be raised or lowered to control the distance from the heat source. This versatility enables it to handle a range of tasks, from melting cheese and crisping up dishes to finishing off meals with a perfect golden-brown top.
History and Evolution
Originally developed for professional kitchens, the home kitchen salamander has evolved over time to incorporate advanced features such as digital controls and enhanced safety mechanisms. Traditionally, salamanders were installed as a fixed unit above a cooking range or grill. Today, modern versions offer more flexibility, including countertop models and those that integrate seamlessly into custom kitchen designs.
Benefits of a Kitchen Salamander
Precision Cooking
One of the primary advantages of a home kitchen salamander is its precision. The direct heat source allows for meticulous control over cooking temperatures, making it easier to achieve perfect results every time. Whether you’re broiling, glazing, or melting, the salamander provides consistent, even heat that can be finely tuned to meet your culinary needs.
Speed and Efficiency
The intense heat generated by a salamander means that it can cook or finish dishes faster than traditional ovens. This efficiency is particularly useful for tasks that require a quick burst of heat, such as browning the top of a dish or melting cheese. For busy home cooks, this translates to faster meal preparation and less time spent waiting.
Versatility
home kitchen salamander are incredibly versatile appliances. They can handle a variety of cooking tasks, including broiling, toasting, grilling, and even reheating. This makes them a valuable addition to any kitchen, as they can be used for a wide range of dishes and cooking techniques.
Space-Saving Design
Many modern home kitchen salamander are designed with space-saving in mind. Their compact size means they can be integrated into smaller kitchens or used as a countertop appliance. This allows for efficient use of kitchen space without sacrificing functionality.
Types of Kitchen Salamanders
Gas vs. Electric Salamanders
home kitchen salamander can be powered by either gas or electricity, and each type has its own advantages:
- Gas Salamanders: These models offer instant heat and can be more cost-effective to operate over time. They provide a traditional broiling experience and are often preferred in professional kitchens for their high heat output and control.
- Electric Salamanders: Electric models are known for their convenience and ease of use. They typically feature digital controls that allow for precise temperature adjustments. Electric salamanders also tend to have a more modern design and can be easier to integrate into home kitchens.
Countertop vs. Built-In Salamanders
- Countertop Salamanders: These are freestanding units that sit on your home kitchen salamander counter. They are ideal for those who want the flexibility to move the appliance as needed or for kitchens with limited installation options.
- Built-In Salamanders: These models are designed to be installed into cabinetry or as part of a custom kitchen setup. They offer a sleek, integrated look and can be customized to fit your kitchen’s design.

Choosing the Right Salamander for Your Kitchen
When selecting a home kitchen salamander, consider the following factors to ensure you choose the right model for your needs:
Size and Capacity
Assess the size of your kitchen and the amount of cooking you plan to do. For smaller kitchens, a countertop model may be sufficient, while larger kitchens may benefit from a built-in unit with a higher capacity.
Features and Controls
Look for features that match your cooking style. Digital controls offer precision, while manual knobs provide a more traditional experience. Additional features like adjustable racks and timers can also enhance functionality.
Installation and Space
Consider the available space in your home kitchen salamander and how the salamander will be installed. If you’re opting for a built-in model, ensure that your kitchen can accommodate it and that you have the necessary hookups.
Installing a Kitchen Salamander
Proper installation is crucial for optimal performance and safety. Whether you’re installing a countertop or built-in salamander, follow these general steps:
Countertop Installation
- Choose the Location: Select a stable, heat-resistant surface for the salamander. Ensure there is enough clearance around the appliance for ventilation.
- Power and Gas Hookup: For electric models, plug the salamander into a suitable electrical outlet. For gas models, ensure that a professional installs the gas line according to local regulations.
- Leveling: Adjust the feet or supports to level the salamander and ensure stability.
Built-In Installation
- Prepare the Space: Measure the installation area and ensure it meets the dimensions of the home kitchen salamander. Make any necessary adjustments to cabinetry or countertops.
- Install the Salamander: Follow the manufacturer’s instructions for securing the salamander in place. Ensure proper ventilation and access to power or gas.
- Testing: Before using the salamander, test it to ensure that it operates correctly and that there are no issues with heat distribution.
Using a Kitchen Salamander
To get the most out of your home kitchen salamander, familiarize yourself with its operation and best practices:
Preheating
Always preheat the salamander before use to ensure it reaches the desired temperature. This step is crucial for achieving even and consistent results.
Cooking Techniques
Explore different cooking techniques with your home kitchen salamander:
- Broiling: Place food under the salamander and adjust the rack position to control the distance from the heat source. This technique is great for melting cheese or browning the top of dishes.
- Toasting: Use the salamander to toast bread or other items quickly and evenly.
- Grilling: The intense heat can mimic grilling, giving a charred effect to meats and vegetables.
Cleaning and Maintenance
Keep your home kitchen salamander in top condition with regular cleaning:
- Cool Down: Allow the salamander to cool completely before cleaning.
- Wipe Down: Use a damp cloth to wipe the interior and exterior surfaces. Avoid abrasive cleaners that could damage the finish.
- Check for Debris: Remove any food particles or debris from the racks and interior.
Creative Uses for a Kitchen Salamander
The salamander’s versatility allows for a range of creative applications:
- Desserts: Perfect for finishing off desserts like crème brûlée with a caramelized top or melting chocolate for a glossy finish.
- Appetizers: Quickly crisp up appetizers like bruschetta or nachos.
- Main Courses: Use the salamander to add a final touch to dishes such as gratins or casseroles, achieving a beautiful, crispy top.
Maintaining and Troubleshooting Your home kitchen salamander
Regular Maintenance
Maintaining your kitchen salamander is crucial for ensuring its longevity and optimal performance. Here are some tips for keeping your appliance in top condition:
- Regular Cleaning: Clean the home kitchen salamander regularly to prevent the buildup of grease and food particles. After each use, wipe down the interior surfaces with a damp cloth to remove any spills or splatters. For deeper cleans, use a non-abrasive cleaner suitable for the appliance’s material.
- Inspect Components: Periodically check the racks, heat elements, and any removable parts for wear and tear. Ensure that racks are secure and that there are no loose or damaged components.
- Ventilation: Ensure that the salamander’s ventilation areas are clear of obstructions. Proper airflow is essential for maintaining even heat distribution and preventing overheating.
- Professional Servicing: Schedule professional servicing if you notice any issues with performance or if the appliance requires complex repairs. Regular check-ups can help identify potential problems before they become significant.
Troubleshooting Common Issues
While home kitchen salamander are generally reliable, occasional issues may arise. Here’s how to address common problems:
- Uneven Heating: If you notice that the salamander is not heating evenly, check the heat elements for any signs of damage or malfunction. Ensure that the rack is positioned correctly and that there are no obstructions affecting heat distribution.
- Temperature Fluctuations: Fluctuations in temperature may be due to a faulty thermostat or control panel. Test the appliance using different settings to determine if the issue persists. If temperature inconsistencies continue, consult the manufacturer or a professional technician.
- Smoke or Odors: If your salamander produces excessive smoke or unusual odors, it may be due to residue buildup or incorrect use. Ensure the appliance is clean and check for any food particles that may be burning. Allow the salamander to cool and clean it thoroughly.
- Power Issues: If the salamander fails to turn on, check the power supply and ensure that the appliance is plugged in correctly. For gas models, verify that the gas supply is turned on. If power issues persist, consult a technician to inspect the electrical or gas connections.
Integrating a Salamander into Your Kitchen Design
Incorporating a home kitchen salamander into your kitchen design can enhance both the functionality and aesthetics of the space. Here’s how to make the most of this versatile appliance:
Design Considerations
- Location and Placement: Consider the placement of the salamander to ensure easy access while maintaining a cohesive kitchen layout. For built-in models, integrate the home kitchen salamander into cabinetry or custom installations to create a seamless look.
- Aesthetic Integration: Choose a salamander that complements your kitchen’s design. Many modern models come in various finishes and styles, allowing you to match the appliance with your existing décor.
- Functionality: Ensure that the salamander’s placement allows for efficient use. For example, place it near the prep area or cooking range for easy access during meal preparation.
- Ventilation: Proper ventilation is essential for maintaining air quality and preventing heat buildup. Ensure that the salamander’s installation allows for adequate airflow and that any necessary vents or ducts are properly positioned.
Customizing Your Salamander Setup
- Adjustable Racks: Many home kitchen salamander feature adjustable racks that can be customized to fit different types of dishes. Experiment with rack positions to achieve the desired results for various cooking techniques.
- Temperature Settings: Utilize the salamander’s temperature settings to suit different cooking tasks. Adjust the heat intensity based on the type of food and the desired outcome.
- Additional Accessories: Consider adding accessories such as heat-resistant trays or specialty racks to enhance the salamander’s versatility. These accessories can help with specific cooking tasks and improve overall functionality.
Creative Recipe Ideas Using a Salamander
To showcase the capabilities of your salamander, try experimenting with these creative recipes:
1. Classic Crème Brûlée
Ingredients:
- 4 large egg yolks
- 1/2 cup granulated sugar
- 2 cups heavy cream
- 1 vanilla bean, split and scraped
- Extra sugar for caramelizing
Instructions:
- Preheat the salamander to high heat.
- In a bowl, whisk together egg yolks and granulated sugar until pale and smooth.
- Heat the cream and vanilla bean in a saucepan until just simmering. Remove from heat and gradually add to the egg yolk mixture, stirring continuously.
- Strain the mixture into ramekins and bake in a water bath at 325°F (163°C) until set.
- Once cooled, sprinkle a thin layer of sugar on top and place under the home kitchen salamander to caramelize the sugar until golden brown.
2. Melting Cheese on Baked Potatoes
Ingredients:
- 4 large baked potatoes
- 1 cup shredded cheddar cheese
- 4 tablespoons sour cream
- Chopped chives for garnish
Instructions:
- Preheat the salamander to high heat.
- Place the baked potatoes on a baking sheet and top each with shredded cheddar cheese.
- Place the baking sheet under the home kitchen salamander and broil until the cheese is melted and bubbly.
- Remove from the salamander, add a dollop of sour cream, and garnish with chopped chives.
Bruschetta with Tomato and Basil
Ingredients:
- 1 loaf of crusty Italian bread, sliced
- 2 cups diced tomatoes
- 1/4 cup chopped fresh basil
- 2 cloves garlic, minced
- Olive oil
- Salt and pepper to taste
Instructions:
- Preheat the salamander to high heat.
- Arrange the bread slices on a baking sheet and brush with olive oil.
- Place the baking sheet under the salamander and toast the bread until golden brown and crispy.
- In a bowl, combine tomatoes, basil, garlic, olive oil, salt, and pepper. Spoon the mixture onto the toasted bread slices and serve immediately.
Recipes to Try with Your Salamander
To make the most of your home kitchen salamander, try these recipes that showcase its unique capabilities:
1. Salmon with Herb Crust
Ingredients:
- 4 salmon fillets
- 1 cup breadcrumbs
- 1/4 cup chopped fresh parsley
- 2 tablespoons grated Parmesan cheese
- 2 tablespoons olive oil
- Salt and pepper to taste
Instructions:
- Preheat the salamander to high heat.
- In a bowl, combine breadcrumbs, parsley, Parmesan cheese, olive oil, salt, and pepper.
- Place salmon fillets on a baking sheet and press the breadcrumb mixture onto each fillet.
- Place the baking sheet under the salamander and broil until the crust is golden brown and the salmon is cooked through, about 8-10 minutes.
Safety Tips for Using a Salamander
When using your home kitchen salamander, prioritize safety to prevent accidents and ensure proper operation:
- Read the Manual: Familiarize yourself with the manufacturer’s instructions and safety warnings before using the salamander.
- Avoid Overloading: Do not overload the salamander or place too many items close together. This can affect heat distribution and increase the risk of accidents.
- Use Heat-Resistant Tools: Always use heat-resistant gloves or tools when handling hot trays or dishes.
- Supervise Children: Keep children away from the salamander when it is in use to prevent burns or other accidents.
- Regular Checks: Periodically inspect the salamander for any signs of wear or damage. Address any issues promptly to maintain safe operation.
To sum up
You may greatly improve your cooking experience with the help of this strong and multipurpose home kitchen salamander. It’s perfect for jobs like melting, broiling, and precisely completing foods because of its high-powered, direct heat output. You may unleash a world of culinary possibilities and produce results that rival those of a professional kitchen by learning its characteristics, becoming proficient with its sophisticated procedures, and carefully integrating it into your kitchen design.


